


Recommended resolution: 800x600x64K
 Deutsche Version
I8kfanGUI V1.8 User Manual
Contents
- Installation
- Main window
- Options window
- CPU temperature control
- System info window
- Removing the program
1. Installation
First, decompress the downloaded zip archive to a directory on your harddrive. The installation procedure
depends on which operating system you are using. If you're using Windows 95, 98,
or ME, then you can simply execute the i8kfangui program and don't need to install anything else.
If you're going to use i8kfangui on Windows NT, 2000, or XP, then you need to install the fanio driver first. To install the driver, change to the fanio subdirectory and start the faninst program:

Click on the 'Install driver' button. After this, a second window opens:
Please don't change any of the settings on this window (they are for experienced users who known what the settings mean). Click on the 'Install' button. After a few seconds you see this:
Click on OK, Close, and Close (in this sequence). Now you can run the i8kfangui program.
2. Main window
Every time you start or open the i8kfangui program, you will see the main window:
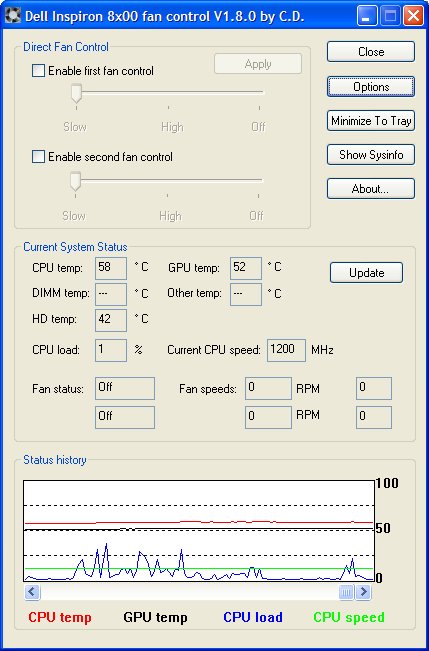
The main window is divided into four parts:
- Direct Fan Control
- Current System Status
- Status History
- The Buttons
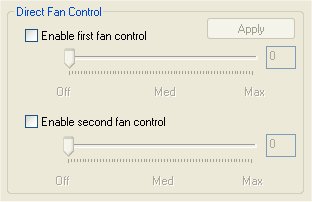
2.1 Direct Fan Control
This part of the main window allows you to set the speed of upto two fans directly. To set a speed, enable the check box for the corresponding fan, set the speed with the slider, and click on the 'Apply' button. You can also set the speeds for both fans at the same time by enabling the check boxes for both fans.
Several Dell notebooks are equipped with only one fan. In this case, you have to find out yourself which check box controls the fan.
The two speeds 'Slow' and 'High' are preprogrammed speeds and are controlled by the BIOS. There's currently no known way to change the preprogrammed speeds to different ones (as an alternative see hardware sensor support).
2.2 Current System Status
Here you can watch the current status of the sensors in your notebook. The values shown here correspond with the sensors that i8kfangui found on your system. You can enable and disable the sensor readings on the options window.
- CPU temp: the current CPU temperature
- GPU temp: the current temperature of the graphics chip
- DIMM temp: the current temperature of the memory area
- Other temp: the current temperature of a sensor at an unknown position
- HD temp: the current temperature of the harddisk
- CPU load: the current load of the CPU in percent
- Current CPU speed: the current speed of the CPU
- Fan status: the current fan speeds (one of 'Off', 'Slow' or 'High')
- Fan speeds: the current fan speeds in RPM (revolutions per minute)
The temperatures are shown in °C or °F. You can change between the two scales on the options window. The shown values are updated in fixed intervals which are adjustable on the options window, too. You can activate an immediate display update if you click on the 'Update' button.
2.3 Status History
This section shows the history of the temperatures of the CPU and GPU in addition to the CPU load and speed. The diagram is updated every time when the sensors are read and shown in the 'Current System Status' area. The diagram scrolls from the right to the left. You can scroll through the values manually by moving the slider below the diagram to the left or right.
2.4 The Buttons
On the upper right area of the main window are several buttons which perform different actions when clicked:
- Close: closes the main window and shuts the program down
- Options: opens the options window
- Minimize To Tray: closes the main window and puts the program in the system tray
- Show Sysinfo: opens the sysinfo window
- About: shows the credits along with links to some project web pages
On this window, you can tweak i8kfangui to your needs. The options are grouped in six categories:
- Autostart
- CPU temp control (explained later)
- Display options
- Status reading
- Direct fan control
- Miscellaneous
3.1 Autostart options
If you want i8kfangui to start automatically on every reboot, then this is the place to enable this.
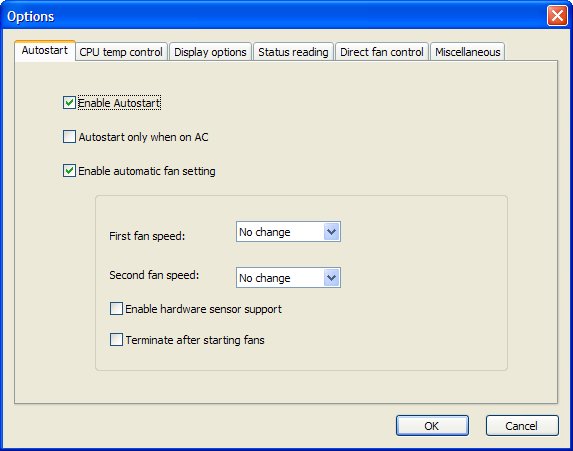
- Enable Autostart
- Enable this option to make i8kfangui start automatically on every reboot and to put itself into
the system tray after the start.
- Autostart only when on AC
- No comment necessary, I guess.
- Enable automatic fan setting
- By enabling this option you can set the fans to a certain speed when the system restarts. This option is
not available if either the temperature control or the observer mode is activated.
See also the 'Maintain fan speeds' option at the Direct fan control options.
- Enable hardware sensor support
- If you enable this option, then the program tries to search for a supported fan sensor chip on the motherboard
of your notebook (read the warning message carefully). If it detects a supported sensor chip, then you can
set the speeds to one of 64 different levels instead of just slow, fast, off:
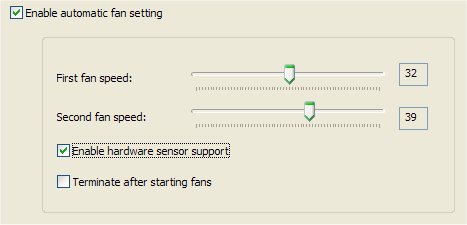
- Terminate after starting fans
- Causes the program to terminate immediately after starting the fans.
- Enable hardware sensor support
3.2 Display options
Here you can change the displaying of values and the values shown in the system tray icon.
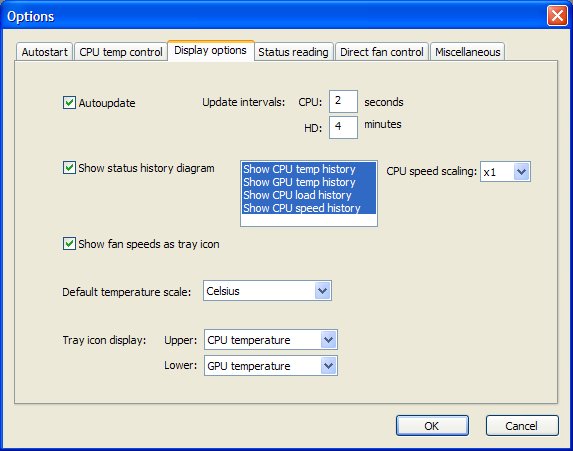
- Autoupdate
- This option enables the automatic reading of sensor data at specified intervals. You can choose
two intervals, one for the reading of the harddisk temperature and one for the motherboard sensors.
The harddisk temperature update interval can only be set in minutes to prevent a significant speed
degradation when reading the HD's temperature. The reading of a HD's temperature is a very complex task
for the system and can take upto a second or longer during which the drive can be unusuable for other programs.
You should leave this interval at the default four minutes.
The autoupdate option will be enabled automatically if you enable the CPU temperature control or the maintain fan speeds option.
- Show status history diagram
- Turns the automatic displaying of the history diagram on the main window on and off. In the box next to this
option, you can choose which values should be shown in the diagram. The CPU speed scaling option to the right
sets a scaling factor for the CPU speed when shown in the diagram (i.e. a CPU speed of 1200MHz is displayed as
the value 24 in the diagram when choosing the scaling factor 2, or as 36 with factor 3 etc.). This option makes it easier
to see CPU speed changes (due to Speedstep) in the status diagram.
- Show fan speeds as tray icon
- Enables the display of a second tray icon which shows the current fan speeds. If the program
can read the fan speeds as RPM, then they are shown in thousands units (i.e. 6000RPM = 06). If the program
can read the fan status only, then the speeds are shown as '00' (off), 'Sl' (slow), or 'Hi' (high).
- Default temperature scale
- Sets the default temperature scale to either Celsius or Fahrenheit. This automatically converts all temperature
values on the main window and on the CPU temperature control option tab to the new scale.
- Tray icon display
- This option lets you choose which temperatures or system values you want to see in the tray icon. You can choose upto
two different values which are shown as one tray icon. The two options determine which value
to show in the upper and lower part of the icon, respectively.
3.3 Status reading options
Here you can select the temperature sensors and system values i8kfangui should read. The availability of the individual sensors depends on your particular notebook model and the BIOS version you are using.
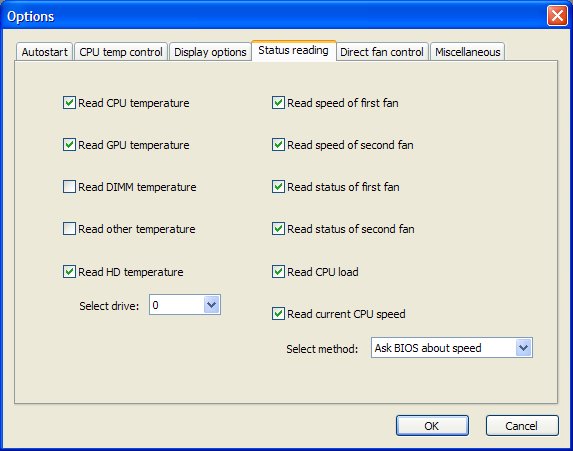
- Read CPU/GPU/DIMM/other temperature
- Enables the temperature reading from the corresponding sensors. The program does not talk to the
sensor chip on the motherboard directly, instead, it tries to read the temperatures through a diagnostics interface
which is provided by the BIOS. That's why this depends on the BIOS version. Some BIOS versions support
reading certain sensors, others don't. As mentioned above, this also depends heavily on your notebook model.
The program automatically disables the GPU/DIMM/other temperature reading if it detects a BIOS version change (that means, if you flashed to a newer or a previous BIOS version). In this case you have to reenable the reading options to see if they still work with the newer/older BIOS version.
- Read HD temperature
- This option enables the reading of the temperature from a harddrive. You can choose the drive
from the dropdown list box.
- Read fan speeds/status
- Select the fans to read the speeds in RPM and the status from. The availability of these options
also depends on the notebook model and BIOS version.
- Read CPU load
- This option enables the displaying of the current CPU load
which can be used in the history diagram to observe CPU temperature or speed changes in correlation to the
CPU load.
- Read current CPU speed
- The program can detect the current CPU speed by using one of three methods: it can ask
the BIOS to report the current speed, it can ask Windows to do that (very unreliable!), or the program can calculate the current speed by itself. The calculation
takes place by executing some loops and measuring the time the CPU needed to execute them. This time
can then be converted into a MHz number. The realtime calculation method usually causes a 1-5 MHz deviation
from the theoretical speed due to minimal timing differences. But it is a
reliable alternative compared to the 'should-be' speed reported by the BIOS.
3.4 Direct fan control options
These options extend the direct fan control feature on the main window.
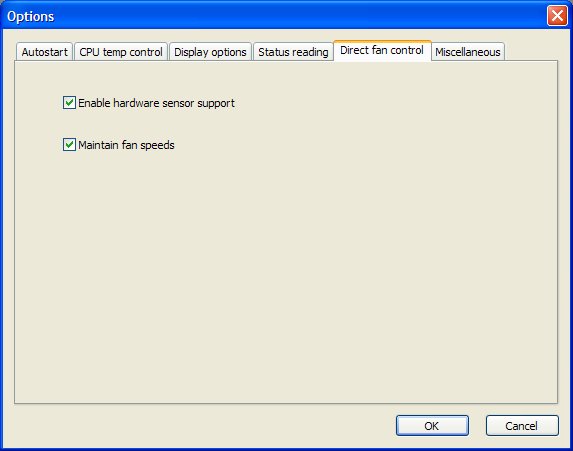
- Enable hardware sensor support
- If you enable this option, then the program tries to search for a supported fan sensor chip on the motherboard
of your notebook (read the warning message carefully). If it detects a supported sensor chip,
then the sliders for the fans on the main window change from the 'Slow', 'High', and 'Off' settings to sliders
with 64 speed levels. On the main window, you can then try to set the fans' speeds in the range from off
to the maximum speed they are capable of:
- Maintain fan speeds
- This option provides a mechanism to maintain the fan speeds if they are set by the direct fan control
on the main window or by the autostart feature. With this option enabled, the program constantly monitors the current fan speeds and
tries to set them back to the last set fan speeds if the BIOS or another program turns the fans off. This
ensures that the
fans are never off, but it also takes care of the BIOS which can still set its own fan speeds when necessary.
You should enable this option if you want to use the direct fan control to provide the notebook with
constant cooling.
If this option is not enabled (default), then the fan speeds are not controlled once they are set in the direct fan control or on autostart. The fans are staying at the specified speed until the BIOS intercepts or until they are changed again via direct fan control or upon reboot.
This option has no effect if the CPU temperature control is active.
3.5 Miscellaneous options
This category consists of some options that didn't fit into the other ones.
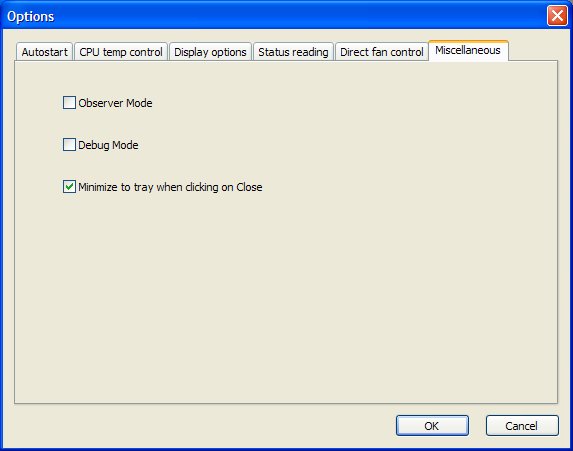
- Observer Mode
- Enabling this option puts i8kfangui into a mode that prevents any kind of fan control through the
program. All options and controls that provide fan control mechanisms become disabled and are no longer
accessible by the user. This includes the direct fan control on the main window, the CPU temperature
control, the setting of fan speeds upon autostart, and the maintain fan speeds option. You should enable
this mode if you want to use i8kfangui to show the system status and temperatures only and to avoid taking over the
fan control intentionally or by accident.
- Debug Mode
- This mode enables the tracking of problems through log files which are generated by i8kfangui at
runtime. The log file is called i8kfangui.log and is in the same directory the program is in. You should leave
this option disabled unless you are trying to track problems and known what the messages in the log file
mean.
- Minimize to tray when clicking on Close
- Well, the option title says it all. Enabling this option changes the behaviour of the 'Close' button
on the main window. Instead of shutting down the program, the program minimizes to the tray. Thus,
the 'Close' button becomes similar to the functionality of the 'Minimize To Tray' button.
The CPU temperature control can be used to automatically regulate the fans depending on the CPU temperature. You can define the fan speeds which are to be used when the CPU temperature falls within different temperature ranges.
The CPU temperature can be controlled on the options window:

The CPU temperature control area consists of two parts. In the lower part, you can select the temperatures for four different temperature ranges and the fan speeds that are to be used when the temperature reaches the respective turn on value. In the above picture, the first temperature range starts at 60°C and ends at 50°C. If the CPU temperature reaches 60°C, the CPU temperature control sets both fans to slow speed. If the temperature goes below 50°C again, then the fans are switched off. Instead, if the temperature rises further and reaches 70°C (the beginning of the second range), then both fans are switched to fast speeds. If the temperature falls again and reaches the 60°C-50°C range, the fans are switched back to slow speed. And so on. The temperature ranges must be incremental, that means, the ranges must have ascending temperature values.
You can change the ranges at anytime to suit your needs. To make switching between different range sets easier, you can predefine upto four profiles and switch between them by using the dropdown list box next to 'Select profile:'. You can change the profile values by clicking on the 'Modify profiles' button. This opens the profile window with the current predefined profiles:
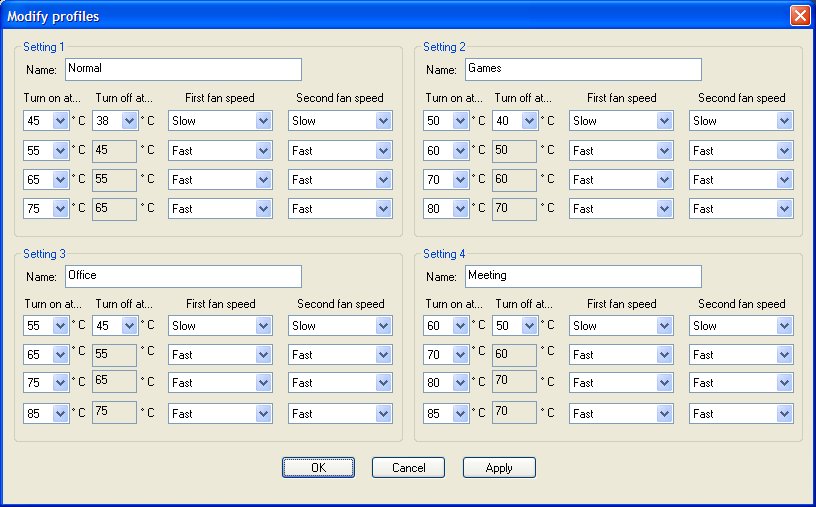
Here, you can adjust the profiles to your desire. All four profiles are independend from each other.
The temperature control can automatically maintain fan speeds if the program is capable of reading the current fans' status. In this case, the temp control can adjust the fan speeds back to the desired speeds if the BIOS tries to intercept to turn them off or to a lower speed. If the temperature control is active, then it coexists with the BIOS' thermal algorithms which are usually in charge of controlling the fans in relation to the CPU temperature.
If you terminate the program while the temperature control is active, then the fans stay at the current speed set by the temp control and the BIOS' thermal algorithms take back the complete control over the fans.
This window opens when you click on the sysinfo button on the main window.
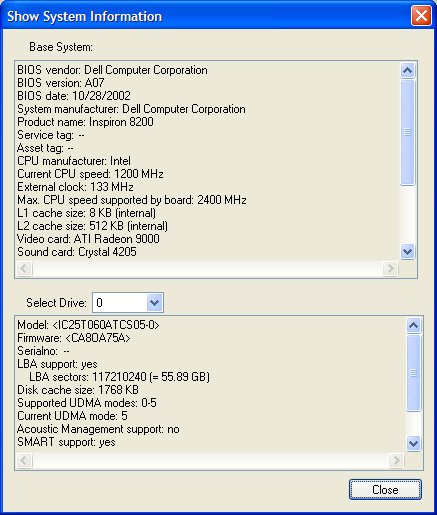
In the upper box you can find general information about your system internals such as BIOS data, CPU info, battery information etc. The second box displays general harddisk data. You can choose which drive's data to show from the dropdown list box if you have two or more internal drives.
If you want to get rid of the program, then go ahead. First, terminate i8kfangui if it's still running. Open the registry editor by typing regedit in the run box from the start menu. In the registry editor, navigate to the tree
HKEY_CURRENT_USER\Softwareand delete the entry CD in the tree view. Now navigate to the tree
HKEY_CURRENT_USER\Software\Microsoft\Windows\CurrentVersion\Runand delete the value i8kfangui in the value view. After you have done this, you can delete the i8kfangui program and all other files related to it which were in the zip archive. If you were using i8kfangui on Windows 95, 98, or ME, then you're done.
Users of Windows NT, 2000, and XP also need to uninstall the fanio driver. Start the faninst program which was in the zip archive i8kfangui came in:
On the main window, click on the 'Remove driver' button. This opens the following window:
Click on the 'Remove' button. After several seconds, this message pops up:
If there's an error in the removal process, try rebooting and repeat the fanio removal process. Maybe in one of the next versions there will be an automatic removal program. Maybe...
© 2003 Christian Diefer

[ News ] [ SpeedswitchXP ] [ I8kfanGUI ] [ DiceRTE ] [ Forum ] [ Links ]
Last Update: 26. Mar 2003  Christian Diefer